A Cupcake and a Hug
October 2007
“When you look at a cupcake, you just have to smile.” - Anne Byrn

Vanilla bean cupcake stuffed with chocolate ganache.
Great idea Annie- you represent Hershey well!


Posted in Cupcakes.
– October 22, 2007
Victory is mine. I am feeling much better after last week’s cake-tastrophy. I took a fondant and gum paste refresher class this morning and made a few practice runs. I realize that I may be the only person in the world who thinks fondant tastes good, but it sure looks pretty!
The Wilton bow with curly q’s and a daisy:

First I added a few white polka dots, which gives it a new look.

Finishing off the bow gave it a more dramatic look. I balanced the added height with a pink border at the base.

Life is all about the accessories. Here goes with green dots and double daisies. This one felt more like a birthday cake.

Things I learned from this activity:
- Bows and dots are the way to go!
- It’s all how the pieces fit together, so be creative with the mix n’ match
- To evenly coat a board for rolling fondant (or pie crust) use a dusting pouch / tied coffee filter to spread the sugar
- Use piping get at the base of the cake to “glue” down fondant edges, so you don’t see the extra icing smoosh out the bottom
- Everything looks better with glitter (but I already knew that because I am from NJ)
Posted in Celebration Cakes, Musings and Inspiration.
– October 6, 2007
Last week I made a decadent chocolate butter cake with strawberry filling and real buttercream icing using the recipes from “The Whimsical Bakehouse” book. I was very excited because the house buttercream from the Whimsical Bakehouse really will change your life. The lightness and balance between creamy and sweet is wonderful.
I iced it as a standard layer cake even though the architectural feats of the WB cakes look and sound very approachable on the pages. Off to the Delaware beaches we went. When we arrived- CAKE-TASTROPHY! The top layer slid right off the bottom and smooshed itself up against the side of the carrier. Whoops. What went wrong? Did the buttercream warm up to a slippery goo and undermined the integrity of the layers? Did the tall layers of cake require wooden doweling to hold together on the long journey? Was the traffic on 295 too much for the previously sheltered cake to bear? We may never know.
But the show must go on! We have birthdays to celebrate and yumminess to devour. With a small spatula, my nimble assistant Kate and I were able to lift the top layer and re-form the basic cake structure. We then scraped off the remnants of pink swags, green scroll work, and white daises from the sides of the cake and restored the snow white base coating. The next step was to re-create a pink-tinted tie dye of colored icing on the vertical sides. By re-piping some of the colored icing into a message on the top and sticking on some well-placed sugar sprinkle flowers we created a whole new design that would have made MacGyver proud.
My one regret is that my camera batteries died and in all of the excitement I did not get a photo of the Franken-cake at any stage to share with you. However, we DID get to honor a wonderful woman’s birthday with candles, chocolate, and song. And THAT is what this is all about.
There is a good lesson here. You can’t control everything, but it is what is underneath that counts. With a little ingenuity, creativity, and grace you come away with a few extra laughs at the party.
Posted in Musings and Inspiration.
– October 1, 2007
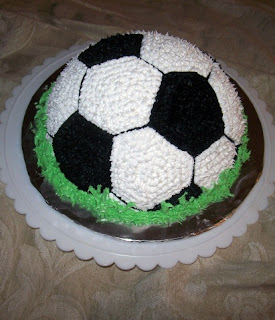 For this soccer ball cake, which was requested for the kick-off meeting of this year’s NCL class, I broke out the Betty Crocker Bake n’ Fill. It makes a perfect round shape. Usually I fill them with ice cream, but since this one needed a little time out of the freezer for decorating the top, I went with something less melty but true to the color theme- Cookies and Cream.
Cookies and Cream Filled Cake
What you need:
- Betty Crocker Bake n’ Fill Pan
- 1 Box Devil’s Food Cake Mix and ingredients (oil, water, 3 eggs + dash of good vanilla)
- 2 cans Fluffy White icing
- 8 chocolate cream filled cookies (crushed)
- piping bags, 2 identical star tips, a #4 tip for outlining, and some toothpicks.
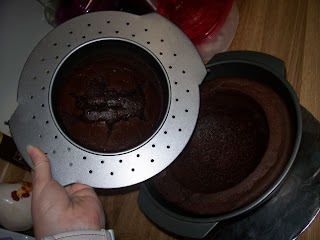
Mix cake according to package instructions. I filled the outer sphere pan and the round insert. This uses one box of cake mix. I had moderate success with the insert because the cake got really tall instead of spreading out in its pan. I am going to cut the top off and use the extra space for the filling, using the round half circle as a kind of plug for the cream filling.
After cake is baked and cooled, it helps to chill it in the fridge or freezer so it holds shape while you ice it.
Cream Filling:
Take 1/2 package of fluffy white frosting and mix it with the crushed cookies. Keeping the sphere in the pan, fill the top 1/3 of the dome with the mixture and ice the remaining empty dome with either the cookie mixture (if you didn’t already eat it) or with plain white icing.
Assembly:
Cut the smaller cake sphere so that it fits in the remainder of the cavity. Since my cake broke, I did this in pieces. Like the tastiest puzzle ever…

Decorating:
Flip the cake onto your cake board and crumb coat with white icing. Sketch out the soccer ball design using a toothpick and outline in black icing. I used a #4 tip for this. Use the Wilton star to fill in the white and black sections. You may have to add a little more confectioners sugar to the fluffy white because it is so whipped up, otherwise it won’t hold the star shape and will just look goopy. I also chilled it a bit once it was in the piping bag.
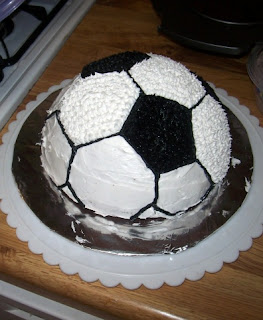
I had a good bit of white icing left over so I tinted it green and put grass around the bottom of the ball. You can use the star tip or grass/hair tip for a nice effect.
Posted in Celebration Cakes.
– September 19, 2007
I love other things besides baking. For instance, shoes and make-up. The fall trendshow at Nordstrom is like the Superbowl for make-up junkies. They let you in the store before it opens for an entertaining and informative runway show of the seasons latest products (on models conveniently wearing Nordy’s fashion and shoes). It feels kind of like being an extra in Zoolander, but there are lots of free samples as each line presents its new products and national artist teams. Smashbox cosmetics have been my favorite for a few years running and their artists are definitely the most fun. Since I was dragging a few friends to the show who are new to the line I knew it would be a taxing morning for the artists and decided to make cookies showcasing my favorite products as a little thank you gift. It was also a yummy snack for us as we waited in lines to try various products.
I can’t have smashbox without Photo Finish Primer,

and some great brushes,

and a touch of lip gloss (Always remember ladies: Lashes, Liner, Lips!),

And a bit of color in signature pots…

It was quite a tasty collection for sure. I used the basic sugar cookie recipe that worked well back at Christmas, but used less cinnamon and more lemoncello. They were a bit dry/crispy for my taste, but I think that might have had more to do with the thickness than the recipe.

Posted in Cookies, Musings and Inspiration.
– September 15, 2007


Bad Behavior has blocked 392 access attempts in the last 7 days.